Raising a Healthy Baby: Baby Food Basics

First off, thank you for all of your positive feedback regarding last week’s post! I love the opportunity to show that making your own baby food is not only easy, but a great way to save money and bond with baby (and your partner!) This week we are going to head backwards and start at the beginning; talking about the “why” and “how” behind making baby food.
As I’ve mentioned a few times, I started this journey with a strong interest in healthy ways to raise my daughter and a stronger desire to save money where I could. That being said, I didn’t know much about where to start. Last year, a good friend of mine Emily, was a nanny for newborn twin girls by day and a nutritionist by night. When our conversations started about introducing foods to those sweet girls, I thought “Wow…I thought making your own food was time-consuming, expensive, and stressful?”
Nope. {Really}
Emily’s experience with the twins reassured me that I could do this, too. I hope, at the very least, you will find my blog to be your “Emily”. Let me assure you there are no hidden steps, no photoshopped pictures, and certainly nothing magical about the process. It’s very simple, cost efficient and with the help of a freezer and some small containers- just as on-the-go as new mommas are.

So, let’s go back to the basics.
The WHOLE process breaks easily into 5 steps:
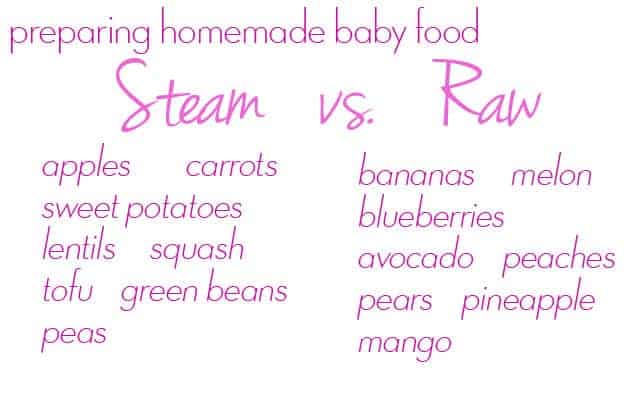
1. The food: steam vs. raw
2. Blend
3. Pour into ice cube trays
4. Freeze overnight
5. Put into baggies/containers
Let’s get started, shall we?
Step 1: Pick your foods. {Start with one at a time}

Step 2: Blend.
Your choice: blender, bullet, fork or food processor all work here. The key is to get it smooth, runny, and close to the consistency of milk. As they practice pushing it around in their mouths and get more interested in “chewing”, you can thicken it. In the beginning, I added the steaming water with the cooked food and breast milk to raw foods to get the right consistency.
Step 3 & 4:
Pour the mixture into ice cube trays (easiest way to store!). Cover with plastic wrap and place carefully into a freezer for about 6-8 hours. My work time is usually after she has gone to bed, so mine have always frozen overnight. You want it completely frozen.
Step 5: When your mixture is completely frozen, twist the ice cube trays until they pop out. I have always had to use a knife to wedge them out, so try that (carefully) if yours don’t “twist” out like mine. From here, I put these little cubes into a labeled freezer bag and stick back in until I need them.
DONE!
If you don’t need to make a huge amount, your mixture will last about 48-72 hours in the fridge. To keep homemade food as convenient as store bought, I take a couple different flavored cubes and put them into her baby food containers to keep in the fridge. {This way, we aren’t having to dig out frozen cubes every time she’s ready to eat.}
**If you find yourself in a pinch and need the food in the freezer right away, microwave in safe container for 10-15 seconds and stir to distribute the heat. If you need more, heat for 3-5 second intervals until perfect. Caroline actually prefers her food a little warmed up. If you’re having trouble getting your munchkin interested in the beginning, try warming it up like this!
Caroline’s Beginner Favorites:
Avocado:
Mash ripe avocado with fork
Mix with milk (anywhere from 1-3 ounces) to make really soupy
Serve with spoon
Banana:
Chop into chunks
Blend with food processor with milk
Serve with spoon
Mandarin Oranges:
Drain from can, rinse quickly with water
Pulse quickly in food processor (no need for added milk or water)
Serve with spoon
Apples:
Peel and chop organic apples
Steam for 10-15 minutes in electric steamer (you can also steam in a pot on the stove)
Blend in food processor with a small amount of water used to steam
Serve with spoon
Spinach and Banana:
Chop banana into chunks
Rinse organic fresh spinach, dry completely
Blend together in food processor until mixed completely
Serve with spoon (or full-fat organic, plain yogurt if you’re like my Caroline)
As you introduce foods, look for signs of allergy such as hives, swelling, or trouble breathing. Diarrhea and dry skin can be signs, too. (Diaper rash is not considered a sign of allergic reaction! Just an irritation from acidic fruits.) And remember, just like Caroline’s cinnamon reaction – an allergy can present itself within 5 minutes or after multiple feedings. My best advice would be to take your time. Of course, call your doctor if you have any questions about allergies.
While introducing solid foods, keep up nursing or bottle feeding as the main part of their nutrition. Next week, I want to share with you how we balance the introduction of solid foods while keeping up with a supply.
As far as cost savings go, you’ll know you’re saving a TON once you see how much organic (even non-organic) baby food jars go for. In my kitchen, an ounce of food usually costs me about $0.02 to $0.05 per ounce. The grocery store stuff?! About $0.23 to $0.023 an ounce. Looking for more cost-saving baby food recipes?
See….no magic here. Just a strong desire to do what’s best for our babies. What are your favorite baby food combos?
See ya’ll next week!
Liz

